FreeBSD10 を無線LANアクセスポイントにする
いままで無線LANアクセスポイントとして専用の機器を使っていました。

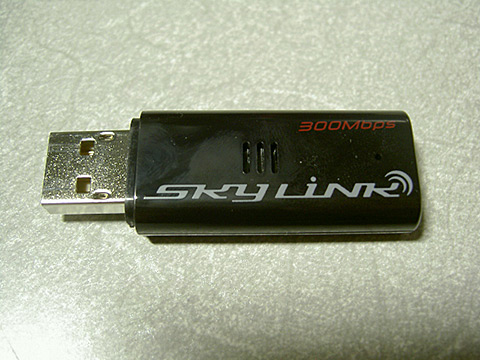
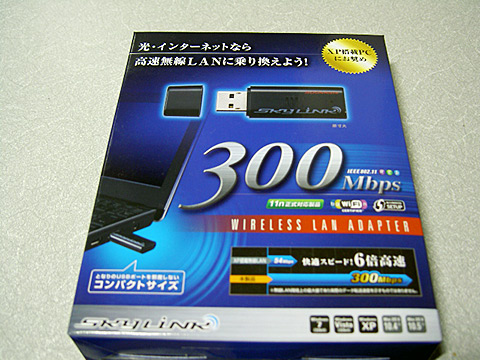
これはこれで小型で場所も取らなくてよかったのですが電波が弱いのか部屋から出ると無線LANの電波が途切れてしまうことがよくあり悩みの種でした。 この Logitec W300N/U2 USB無線LANアダプタを使えば電波も強そうだし設置の場所や電源もとる必要ないのでいいなと思い設定してみた。
ネットで調べるとWindows Mac 以外にもLinux や FreeBSD でも動作することが分かりました。 FreeBSDで無線LANアクセスポイントにするには hostapd を使い /etc/hostapd.conf で設定するだけです。 hostapd はFreeBSDのベースシステムに含まれていて何もインストールする必要はありません。
アクセスポイントの設定
/etc/hostapd.conf
interface=wlan0
logger_syslog=-1
logger_syslog_level=0
logger_stdout=-1
logger_stdout_level=0
dump_file=/tmp/hostapd.dump
debug=0
ctrl_interface=/var/run/hostapd
ctrl_interface_group=wheel
ssid=YOUR_SSID
country_code=JP
hw_mode=g
channel=6
wpa=2
wpa_key_mgmt=WPA-PSK
wpa_passphrase=YOUR_PASSWORD
auth_algs=1
wpa_pairwise=CCMP
rsn_pairwise=CCMP
wpa_group_rekey=600
wpa_strict_rekey=1
wpa_ptk_rekey=600
wep_key_len_broadcast=5
wep_key_len_unicast=5
wep_rekey_period=300
eapol_key_index_workaround=7
eap_reauth_period=0
*ssid, password は自分の環境に合わせること
自動起動の設定
hostapd の自動起動とwlan0デバイスの作成とIPアドレス設定を行う。 起動時に wlan0 に 192.168.1.1 のアドレスを割り当て無線LANルーターとして振る舞えるように gateway_enable の設定を追加する。これを入れることで接続してきた無線LANクライアントが外のインターネットと接続が出来るようになる。
/etc/rc.conf
gateway_enable=YES
wlans_run0="wlan0"
create_args_wlan0="wlanmode hostap channel 1 country jp"
ifconfig_wlan0="inet 192.168.1.1 netmask 255.255.255.0"
hostapd_enable="YES"
無線LANクライアントに自動でIPアドレスを配布
DHCPサーバのインストール
接続してきたPCクライアントに自動的にIPアドレスを割り振るためにDHCPサーバをインストールします。 FreeBSDにはisc-dhcp41-server のパッケージがありますのでpkg installでインストールします。 DHCPサーバの設定
このサーバには元から存在する re0 のネットワーク(192.168.0.0/24) と今回追加した wlan0 に繋がるネットワーク(192.168.1.0/24)の2つのネットワークがあるのでこの2つのネットワークに対してアドレスを配布出来るように設定します。 したがって無線LANで繋がるネットワーク機器のIPアドレスは 192.168.1.200-240 のアドレスとなる。
/usr/local/etc/dhcpd.conf
# dhcpd.conf
#
# Sample configuration file for ISC dhcpd
#

# option definitions common to all supported networks...
option domain-name "example.com";
option domain-name-servers ns.example.com;

default-lease-time 600;
max-lease-time 7200;

# Use this to enble / disable dynamic dns updates globally.
#ddns-update-style none;

# If this DHCP server is the official DHCP server for the local
# network, the authoritative directive should be uncommented.
#authoritative;

# Use this to send dhcp log messages to a different log file (you also
# have to hack syslog.conf to complete the redirection).
log-facility local7;

# No service will be given on this subnet, but declaring it helps the
# DHCP server to understand the network topology.

subnet 192.168.0.0 netmask 255.255.255.0 {
  range 192.168.0.110 192.168.0.140;
  option routers 192.168.0.10;
  option domain-name-servers 192.168.0.10;
}

subnet 192.168.1.0 netmask 255.255.255.0 {
  range 192.168.1.200 192.168.1.240;
  option routers 192.168.1.1;
  option domain-name-servers 192.168.0.10;
}
DHCPサーバの自動起動設定
一般的な自動起動の設定ですがインターフェースの設定が少し違う、今回のサーバの場合ローカルの2つのネットワークに対してアドレス配布を行うためインターフェースの設定に2つのデバイス名(re0 wlan0)を指定している。
/etc/rc.conf
dhcpd_enable="YES"
dhcpd_flags="-q"
dhcpd_conf="/usr/local/etc/dhcpd.conf"
dhcpd_ifaces="re0 wlan0"
dhcpd_withumask="022"
dhcpd_withuser="dhcpd"
dhcpd_withgroup="dhcpd"
wlan0デバイスの確認
設定したサーバを再起動するとwlan0のデバイスは次のように見えるはずです。 ここで設定したアドレス 192.168.1.1 が無線クライアントのゲートウェイアドレスとなります。
$ ifconfig wlan0
wlan0: flags=8843 metric 0 mtu 1500
        ether 00:01:8e:99:15:4f
        inet 192.168.1.1 netmask 0xffffff00 broadcast 192.168.1.255
        inet6 fe80::201:8eff:fe99:154f%wlan0 prefixlen 64 scopeid 0x7
        nd6 options=29
        media: IEEE 802.11 Wireless Ethernet autoselect mode 11g
        status: running
        ssid 0xe5a4a7e5a1a9e5b9b3e585abe9838ee381ae4c414e channel 6 (2437 MHz 11g) bssid 00:01:8e:99:15:4f
        regdomain JAPAN country JP authmode WPA2/802.11i privacy MIXED
        deftxkey 3 wepkey 2:40-bit AES-CCM 3:128-bit wepkey 4:40-bit
        txpower 23 scanvalid 60 protmode CTS wme dtimperiod 1 -dfs
ファイアーウォールに穴あけ
ipfwやらpfなどのパケットフィルタを使っている場合wlan0デバイスから外のインター ネットとのアクセスのためにフィルタを通れるように設定する必要があります。
自分のサーバの場合pfを使っているので次のように設定してwlan0を通るアクセスを素 通り出来るように設定しました。
/etc/pf.conf
pass quick on wlan0 all
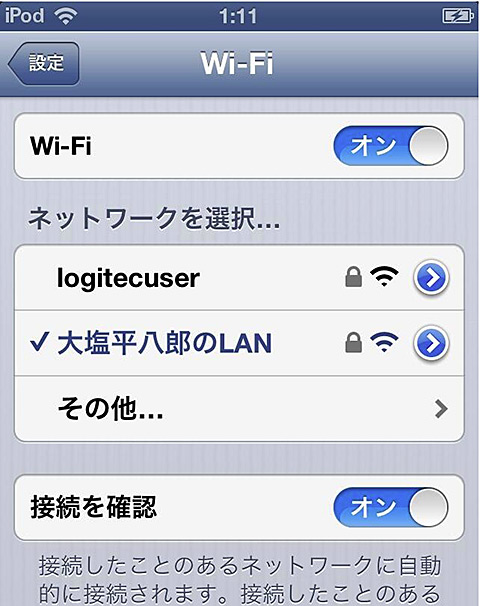
サーバ設定後ipodから無線LANで接続した様子
hostapd で設定して面白い所は ssid に日本語文字が使えるとこです。今回は「大塩平八郎の乱」をもじって 大塩平八郎のLAN としてみましたww